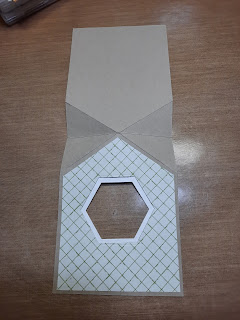
This was such a fun card to make. I saw several different versions of this Fun Fold on Pinterest. I really liked Lisa Curico's version. She added a stand to the inside, to make it a fun 3D project.
Measurements:
FRONT:
• Cardbase: 4 1/4" x 11”, score at 5 1/2"
• DSP: 4” x 5 1/4"
INSIDE:
• Stand: 2” x 2”, score at 1/2", 1”, 1 1/2"
• DSP: 3 3/4” x 4”
• Basic White: 3” x 4”
BACK:
• Basic White: 4” x 5 1/4"
Product List
-Make a pencil mark on the fold mark (where you scored @ 5 1/2) of your cardbase
@ 2 1/8
-With your card open make a mark at 4" and 7" (that will be 1 1/2" from the fold in your card)
-With your Trimmer line up the mark you made at 4" and 2 1/8" (it will be a diagonal) use your scoring blade and score on that diagonal. Repeat the same on the Mark you made at 7"
-Take your piece of DSP (and Basic White CS) that measures 4 x 5 1/4 and make a pencil mark at 2" on the 4" side
-On the 5 1/4" side make a pencil mark at 1 1/2"
-With your Trimmer line up the 1 1/2" mark with the 2" mark (it will be a diagonal)
and cut, rotate and repeat the step. Cut the 4 X 5 1/4" Basic White CS the same way.
-Adhere DSP to front of Cardbase
-Place the 2nd largest Hexagon Die on your Cardbase (carbase should be open) make sure your die doesn't move when you run it through the cut and emboss machine
-Place the 3rd largest Hexagon Die on your 4x3 piece of Basic White CS and run through the cut and emboss machine
-Adhere the 4x3 mat that has the cut out diagonal and adhere it to the inside front of the card (it will be the underside of the front Hexagon cut out)
-Adhere 3 3/4 x 4 DSP Mat to the inside of the card
Now you're ready to decorate your 3D Fun Fold Card
-Stamp bird and wing image and Punch Out
-Stamp branch, leaves and flowers and fussy cut
-Stamp nest and fussy cut
-Stamp wood sign and fussy cut
-With dimensionals adhere your stamped images to the front of the card
-Adhere the 2x2 Crumb Cake Mat (fold according style) to the inside bottom of card centered
-Embellish with In Color Matte Dots
-Adhere Basic White Mat (that is cut the same as the front DSP Mat) to the back of your card after you have decorated it.
SIDE VIEWS


